Dental Services

Discreet And Effective Teeth Straightening

Straightening crooked teeth isn’t just about creating a picture-perfect smile; it can help protect your long-term oral health. Thankfully, some options allow you to avoid metal braces and still enjoy the benefits of straight teeth.

One popular option is invisible aligners. They’re a discreet and effective alternative to traditional braces. Learn More by calling us today.

invisalign

Discreet

Having straight teeth isn’t just about cosmetics. Crooked or overlapping teeth are more likely to get damaged or decay and can contribute to issues such as TMJ disorder. Additionally, crooked teeth may be more difficult to clean thoroughly, increasing the risk of gum disease. Fortunately, there are modern alternatives to metal braces that can give you straighter and cleaner teeth. Some of these options include clear aligners and lingual braces.

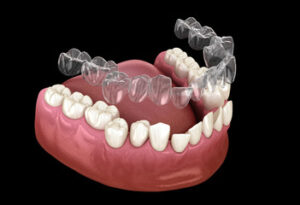
Invisalign is a teeth-straightening treatment that uses clear plastic trays to slowly push your teeth into an improved alignment. This is a less noticeable and more comfortable alternative to traditional metal braces.

There are several benefits to getting your crooked or misaligned teeth fixed, including a healthier mouth, more self-confidence, and a better bite. It is also easier to keep your teeth clean and free of plaque and tartar when they are straighter, making them more resistant to cavities and other dental issues in the future. Finally, having a properly aligned bite can reduce or eliminate problems such as jaw pain and headaches.

When you opt for Invisalign, you’ll wear your trays for 20 to 22 hours each day, removing them only to eat and drink or brush your teeth. You’ll also need to visit your dentist or orthodontist for regular checkups and cleaning. The length of time that it takes to complete your Invisalign treatment varies from patient to patient, but on average it lasts about 12 to 18 months.

Lingual braces are similar to Invisalign in that they are designed to help you straighten your teeth without affecting your appearance. The main difference is that lingual braces are placed on the back of your teeth, rather than the front like traditional braces. This means that they are more discreet, and they will only be visible when you smile.

Both lingual and Invisalign braces are a great choice for adults who don’t want to deal with the embarrassment of wearing metal braces. If you have crooked or overlapping teeth that are detracting from your smile, contact us today to see if either of these treatments is right for you!

Comfortable

Invisalign isn’t just about creating a picture-perfect smile; it also helps to improve the overall health of your teeth. Crooked and misaligned teeth can put you at risk for oral health issues, including gum disease. The good news is, that it doesn’t take long to straighten your teeth with a virtually invisible treatment option. Invisalign is a popular choice for adults and teenagers because it doesn’t involve traditional metal braces, which can be quite uncomfortable to wear and clean.

Studies show that teens wearing Invisalign experience less pain than those wearing traditional metal braces. The reason why is likely because teens are still growing and their mouths are more flexible. It’s also important to note that Invisalign does not require dietary restrictions like with traditional braces. You’re free to eat and drink your favorite foods during the treatment process, but you will need to remove your aligners before eating and then brush and floss before putting them back in. Eating with the trays in place can damage them, which will delay your treatment and stall your progress.

Having said that, the first few days with a new set of aligner trays can feel a bit sore as your teeth begin to adjust to the pressure. However, as you continue to wear them consistently (at least 22 hours a day) you’ll notice that they begin to get more comfortable. It’s also important to keep in mind that removing the trays for meals or snacks can cause them to feel tighter again because your teeth are under constant pressure to shift.

Some patients may also find that they have trouble getting the trays in and out easily, especially at first. If this is a problem, there are soft ’chewies’ available that can help you to get the aligners in and out more easily. Alternatively, there are also small hook tools that can be used to help you get the trays in and out without much discomfort. If you do have any discomfort, taking an over-the-counter pain reliever can help to reduce the symptoms.

Easier To Clean

While the duration of your Invisalign treatment varies, you’ll need to wear your aligners for 22 hours a day and remove them only to eat, brush, floss, and clean them. You can buy cleaning solutions and tablets specifically designed for your Invisalign trays, but you probably have some household products that can also help keep your trays clean and fresh.

It’s important to use non-abrasive cleaning products on your trays since using anything too gritty could scratch the plastic and dull its finish. You should also avoid scented and colored soaps, as these can stain your aligners. You can make a cleaning solution by mixing equal parts hydrogen peroxide and lukewarm water, allowing your trays to soak in the solution for about 20 minutes. This will kill bacteria, which may help eliminate any odors that might have developed.

Another way to help eliminate odors is to rinse your trays with mouthwash, such as Listerine Cool Mint or another brand of mouthwash containing chlorhexidine. Many patients also find that soaking their trays in a solution of one part vinegar to four parts lukewarm water helps dissolve odor-causing food particles and plaque.

The best way to keep your trays clean is to practice good hygiene and follow the instructions provided by your orthodontist. Make sure to rinse your trays before and after every meal, before you put them in your mouth, and before you go to bed. You should also avoid sugary drinks, which can cause stains on your trays, as well as food that may get stuck in your aligners.

It’s a good idea to bring your aligner case with you everywhere you go, to protect them from stray debris and dust. You should also remember to bring a toothbrush and dental wipes with you, so you can clean your trays on the go. It’s also a good idea to schedule an appointment with your orthodontist before you travel so that they can check your teeth and make sure your aligners are in working order. This will ensure that you’ll have no problems while you’re away from home and will prevent delays in your treatment.

Removable

Invisalign is a popular brace for straightening teeth and has helped millions of people worldwide. Compared to standard metal braces, this type of orthodontics is discreet and has the added benefit of being removable. This allows patients to eat the foods they want and avoid some of the restrictions that come with fixed braces.

The Invisalign treatment process involves a consultation to discuss your smile goals and evaluate the condition of your teeth. He will take x-rays and photos of your teeth to get a better understanding of the status of your gum line and to help determine whether you are a good candidate for Invisalign. He will then coordinate directly with Invisalign to create a specialized treatment plan that will take you to the smile you desire.

Clear aligners are customized to fit your mouth. During the process, your doctor will use digital scans (that eliminate the need for gooey impressions) to create a computerized model of your teeth. The model will show how your teeth should shift and the aligners will be fabricated to accommodate those movements. You will wear your aligners for about 22 hours each day, removing them only to eat and drink, brush and floss, and attend your regular appointments with your orthodontist.

It is important to wear your retainers as instructed to maintain your new, straight smile. Retainers can be easily misplaced and if you lose them for an extended period your teeth may begin to shift back to their original position. You can minimize this risk by putting your retainers in a safe place like in your case or using the handy retainer spray to keep them clean on the go.

Straight teeth are not just attractive; they also promote healthy teeth. They are less likely to develop plaque and tartar which can lead to gum disease and tooth loss, and they make it easier to clean your teeth with brushing and flossing. Keeping your teeth healthy during the straightening process can even reduce future problems such as jaw pain and uneven wear on your teeth.

Pest Control

What Does an Exterminator Do?

When pests invade your home, you should seek professional help right away. A pest infestation can lead to serious structural issues with your house, and some pests also spread diseases that can affect your health.

Exterminators’ goal is to remove pests from your property. However, they often fail to address the root cause of the problem. Contact Exterminator Springfield MO now!

Professionalism is an important aspect of the job of an exterminator because pest infestations are often complicated and can cause property damage. In addition, pests can cause health issues for occupants and create an unpleasant living environment. Exterminators must be able to respond quickly and efficiently to requests for service, assess the extent of a pest problem, and provide effective treatment. In addition, pest control workers may need to use hazardous materials and must be able to follow strict safety procedures.

A high school diploma or GED is usually required for a career as an exterminator. However, many employers prefer applicants with previous experience or on-the-job training from a technician position. Specialized training for various pests such as rodents, bed bugs and termites can also be obtained from an employer or industry group. Licensing is also a requirement for most pest control professionals.

Working as an exterminator requires a great deal of physical stamina, as it involves a lot of walking and standing for extended periods of time in uncomfortable conditions. An exterminator must also be able to wear protective gear such as goggles and gloves when handling pesticides. In addition, the ability to communicate with customers in a friendly and helpful manner is crucial to success as an exterminator.

In addition to removing pests, an exterminator is responsible for performing preventive measures on a client’s property. This can include sealing entry points, recommending structural repairs and changing landscaping to reduce the attraction of pests. Additionally, an exterminator can inspect a client’s property to identify early signs of a pest infestation, which can save homeowners thousands in repair costs.

Hiring a professional exterminator is the best way to ensure that a pest problem is resolved quickly and effectively. In addition, many pest control companies offer a guarantee on their services, which provides peace of mind for consumers. A pest-free home can improve a person’s quality of life by making it more enjoyable to cook, sleep and relax without fear of unwanted guests. Additionally, a pest-free environment can help foster better relationships with family members and friends.

Safety

An exterminator is a professional who uses chemicals and other methods to eliminate unwanted pests from homes and businesses. They are also trained to take preventative measures to keep pests from returning. They can help prevent damage to your property caused by pests such as rodents, termites, ants, and fleas.

An exterminator may be self-employed or employed by a large corporation. They typically have set hours and work on a schedule. In some cases, they are required to travel between properties to identify and treat infestations. This can be time-consuming and expensive for the homeowner. In addition, an exterminator may be required to use harsh chemicals that can have a negative impact on human health.

Before an exterminator arrives at your home, they will conduct a thorough inspection to determine the type and severity of the pest problem. They will then recommend the best course of treatment. This can include a chemical treatment, traps, or baits. Many exterminators will also provide long-term prevention methods, such as sealing entry points, removing food sources, and using repellents.

During the early days of pest control, an exterminator’s primary concern was to eradicate the immediate pest infestation. However, as pest control developed further concepts like Integrated Pest Management (IPM) were introduced to focus on both eradicating the infestation and preventing future pest problems.

If you have children or pets, you should consider putting them in a safe place during the extermination process. This will prevent them from being exposed to any dangerous chemicals used in the process. It is also important to remove personal items from the area before the exterminator arrives. This will make it easier for the exterminator to get into tight spaces where pests often hide.

It is also a good idea to store all clothing, shoes, and accessories in plastic bags. This will protect them from the solvent spray utilized during the treatment. In addition, you should clean up all areas where the exterminator has been working to clear away any toxins and additives that may have been left behind.

An exterminator will typically begin their treatment in the kitchen, as this is a common source of cockroach infestations. They will inspect the pantry, drawers, and cabinets for roaches. They will also pull appliances away from the wall and look underneath them to check for roaches in the electrical wiring. Then, they will move to other parts of the house, such as bedrooms, bathrooms, and hallways.

Experience

If you have lived in a home that was plagued by pests, you know the importance of having a pest control professional on hand. Pests can leave behind bacteria, germs, and other harmful substances that can make a person sick. They can also cause structural damage to a house or building.

While a home owner may be able to rid their home of some pests on their own, many require the help of an exterminator. These professionals are highly trained to handle infestations of pests such as cockroaches, beetles, fleas, termites, and ticks.

These specialists use a variety of tools to treat and control pests, including chemicals, traps, and natural remedies. They can also provide preventative measures to keep pests away from homes and businesses in the future.

An exterminator will often start their work by assessing the area to be treated. They will examine the space for signs of a pest problem, such as droppings or chewed wood. They will then determine the best course of action for the treatment. For example, if the problem is an infestation of cockroaches in the kitchen, the exterminator will likely begin by pulling appliances away from the wall and checking underneath them. They will also inspect cabinetry and drains, as cockroaches are known to nest in drains.

The average salary of an exterminator is $49,710. However, the job can be hazardous and requires a high level of skill. Exterminators must be able to follow strict safety protocols when handling toxic chemicals. They must also be able to wear protective gear such as respirators and gloves. Additionally, a successful exterminator must be able to travel to various sites to perform their duties. This can be difficult for those with family or other commitments.

Convenience

A pest infestation can be a nuisance and cause a lot of stress. It can be dangerous to one’s health and may damage property. It is also difficult to eradicate them without proper professional help. There are several measures an exterminator takes to control pests in a home, including using pesticides, baits, traps, and other forms of preventative maintenance. In addition, an exterminator can set up long-term prevention methods that can keep the problem from reoccurring.

When an exterminator arrives to treat a pest infestation, they conduct a thorough inspection of the affected area. This allows them to identify the type of pests and determine how severe the problem is. They can then develop a treatment plan based on this information. The sprays used by an exterminator are usually strong and require special handling. This is why it is important for them to be licensed and certified to apply these chemicals. They must also abide by all safety measures during the application process.

Some pests spread germs and diseases that can be dangerous to humans. For example, mosquitoes can spread encephalitis and other dangerous illnesses. Fleas can carry tapeworms and plague, while ticks can transmit Lyme disease. Insects can also sting people and cause painful injuries. A pest exterminator will take steps to ensure that all insects and rodents are eliminated from the property to reduce the risk of harmful effects on human health.

During the first half of the 20th century, many people reacted harshly to pest problems. They hired exterminators who would pump the homes with chemicals, spray the walls, and even bomb the house. Although these methods worked sometimes, they were not a long-term solution. In fact, the pests often returned because these treatments were more like a Band-Aid than an actual cure.

Today, pest exterminators are trained to use safer methods of eradicating pests. They can use natural remedies or chemical treatments that are more targeted to the specific pest infestation. These treatments are less likely to harm your family and pets, as well as the environment, than DIY solutions.

Roofing

How to Evaluate Commercial Roofers

Commercial Roofers Sacramento construct or repair roofs of business structures. They offer specialized expertise, faster turnaround times, cost-effective pricing and warranty services.

Roofers

They work with business owners, commercial builders, engineering firms or roofing consultants. They also bid for a job on what are called tenders or public lists of roofing contractors.

When looking for a commercial roofer, it’s important to find one with extensive experience in your specific roofing type. You’ll want to ask them about the types of projects they’ve completed, and what their process is for completing a project. It’s also a good idea to ask for references. These will help you determine if the roofer is a good fit for your job.

You can also check with local governments to see what, if any, licensing requirements are in place for commercial roofing. For example, in New York state, it is not required to be licensed as a roofer, but you will need to have insurance to perform roofing work on commercial buildings. If you have a business, you will need to carry general liability and workers’ compensation insurance. In addition, the roofer will need to have a bond if they are working on a public job, such as a school or church.

Another qualification that commercial roofers need to have is the ability to read blueprints and understand construction codes. This is important because it allows them to interpret specifications and ensure that their roofing work is up to code. Moreover, it can save them time and money by not having to rework or redo the roof after it’s installed.

Aside from these skills, commercial roofers need to have physical stamina because the job involves a lot of climbing and walking. This is because roofers are working on the rooftops of commercial establishments, which are often several stories high. They also need to be able to work in different weather conditions.

Additionally, commercial roofers should have a strong work ethic and be punctual. Many of these jobs have tight deadlines, and it’s crucial that the roofer can meet them. This is because commercial jobs tend to be bigger than residential ones, and any snag in the process can put the whole project back by weeks or even months. If the roofer can’t meet these deadlines, they may start losing bids to competitors. To avoid this, make sure the contractor provides a detailed scope of work in their proposal.

Experience

Roofers are responsible for protecting the safety and security of business occupants. They also provide maintenance services to commercial properties and inspect the roof to identify issues. A professional commercial roofer will have a good understanding of the construction of different roofing materials and can install a variety of types of roofs. They can also work with a wide range of budgets and are skilled at negotiating contracts.

Roof installation is a demanding job that requires physical strength and a tolerance for working on heights. A commercial roofer may be required to lift objects weighing up to 50 pounds and can remain confined in awkward positions for long periods of time. In addition, a commercial roofer is required to pass regular drug tests and undergo a background check.

Experienced commercial roofers will have a proven track record of quality workmanship. They will be able to provide you with references from previous customers who can vouch for their work. You can even ask for photos of their past projects to help you determine if they are the right fit for your project.

Commercial roofing involves a more complex process than residential roofing. These contractors are familiar with building codes and regulations, which are critical to ensuring the longevity of your roof. A competent contractor will ensure that all work meets or exceeds these guidelines.

Unlike residential roofs, commercial roofs are often flat rather than sloped. This makes them more difficult to maintain, as water and debris can easily pool on the roof. A professional commercial roofer will know how to deal with these issues and will provide you with a warranty on their work.

When comparing bids, make sure each commercial roofer provides a detailed scope of work for their proposal. This will allow you to compare apples-to-apples and ensure that you are getting the best value for your money.

A professional commercial roofer will have experience working on a variety of roofing systems, including single-ply membranes, TPO and EPDM. They will also have knowledge of various metal roof systems, including torch down, corrugated metal and standing seam. They will be able to fabricate and install PVC facial, rake and capping systems and use heat welding techniques to join pieces together.

Insurance

There are a number of insurance coverages that commercial roofers can buy to protect themselves and their businesses. For example, general liability insurance can help cover the cost of repairs or settlements if a customer or third party is injured by your business activities. Roofers also need workers’ compensation insurance to pay for medical treatment and other expenses if an employee is hurt on the job. You might also want to consider commercial umbrella insurance, which is a type of excess insurance that goes above and beyond your normal policy limits in the event you are sued for an amount greater than your current coverage levels.

Depending on the size of your roofing company and the types of insurance you choose, your premium costs will vary. Some of the pricing factors that are used to determine your rates include: the total amount of coverage you select, your business location, the number of employees and your history of claims. The amount of deductible you choose and the type of work your company does can also impact your rate.

If you use power tools or other equipment that creates a fire hazard, for example, this might increase your rate. In addition, the type of vehicle you use to transport your equipment and materials also impacts your rates. Your insurance agent can help you decide on the level of coverage that is right for your roofing business.

Some other insurance coverages that you might consider include:

Errors and omissions (professional liability) insurance: This covers the cost of your legal defense if someone accuses you of doing shoddy work. For example, if a client sues you because you accidentally forget to replace an important vent or install a skylight correctly, this insurance type can help pay for your legal fees.

Construction insurance: This policy covers your building and the materials you have in it. It can also cover your income if you need to temporarily close your business due to an emergency or natural disaster.

Some smaller roofing companies may be able to bundle their general liability, property and workers’ compensation policies into one business owners policy (BOP). This can save you money on your premiums.

References

If you’re evaluating multiple roofing contractors for your project, be sure to ask each of them to provide references from previous clients. This will give you valuable insight into the contractor’s work quality and customer service skills. Additionally, it will help you avoid scams from untrustworthy contractors. Here are some of the key questions to ask a roofer’s references:

What Kind of Roof did They Replace or Repair?

Different types of roofing require specific materials. For example, commercial roofers need to use materials that can withstand heavy loads and varying temperatures. Ask the roofers’ references what materials they used on their projects and how satisfied they were with them.

Did They Complete the Job On Time?

The longer a roof replacement or repair takes, the more money you’ll have to spend and the more disruptions you’ll face in your daily routine. Make sure to find out if the roofer completed their work on time and how they handled any unforeseen delays.

Did They Keep the Work Area Clean?

One of the most important aspects of any construction project is keeping the work area clean. The last thing you want is trash or nails lying around your yard or in your car after the roofers leave. Ask the references if they noticed any debris or trash left behind by the roofers and how they handled it.

Would You Hire Them Again?

The final question you should ask a roofer’s references is whether they would hire them again for future projects. This can give you an idea of how satisfied they were with the contractor’s services and how confident they were in their abilities.

Choosing the right commercial roofers is essential for your building or business. A reliable contractor will ensure that your new roof is high-quality, durable and aesthetically pleasing. They will also guarantee the work and provide a warranty for any repairs or replacements. By asking the right questions, you can be certain that you’re hiring the best roofers for your project.

Plumbing

A Day in the Life of a Plumber

Plumber In Glendora is a tradesman who works with pipes and plumbing fixtures. The job involves repairing and installing systems that take away waste, supply water and regulate indoor temperature.

Plumber

The profession requires an aptitude for problem-solving and critical thinking, as well as physical strength and stamina to lift heavy tools and equipment. Plumbers must also have excellent communication skills to interact with customers.

The job duties of a plumber include installing, repairing and maintaining pipes and plumbing systems. They must also be able to read and interpret blueprints, and have strong critical thinking skills to troubleshoot problems. Other responsibilities include educating customers about plumbing, and responding to customer inquiries and emergency calls. Plumbers often work with other contractors to complete plumbing projects on commercial and residential sites.

Most aspiring plumbers first learn the trade through an apprenticeship program, which typically lasts four to five years and combines on-the-job training with classroom instruction. In addition to learning plumbing basics, apprentices also earn a living wage while they train. After completing the program, many plumbers choose to continue their education by earning a vocational degree or certificate in plumbing.

Plumbing jobs vary by employer, but most require extensive travel to install or repair a variety of different types of plumbing systems and fixtures. These include water supply lines, waste disposal units and heating systems. Some plumbing companies also specialize in a particular type of plumbing system, such as gas or electric systems.

Regardless of the type of project, most plumbers must be comfortable working on a wide range of tasks, including dismantling existing pipework; testing and balancing water pressure; identifying and locating blockages; connecting drains to sewers or stormwater systems; fitting new parts; and making electrical repairs to pumps and valves. Plumbers must also be able to work in cramped spaces and have physical strength for lifting heavy equipment.

Some aspects of a plumber’s job can pose serious health hazards. For example, plumbers who work with sewage systems are exposed to dangerous microbes excreted by people who use the toilet. These bacteria can cause cholera, typhoid, hepatitis and other infectious diseases. Plumbers must wear protective clothing and masks when working with sewage to prevent infections.

To increase the likelihood of finding qualified candidates for your plumber position, include a call to action in your job description. This can be as simple as asking applicants to email a resume to a certain person within the company or directing them to a website where they can apply online. In addition, offer competitive compensation and benefits, such as a bonus program or performance-based pay, to attract qualified candidates.

Education and Training Requirements

The job of plumber is an important one that requires a high level of skill and knowledge. The work can range from installing systems for new construction to troubleshooting and repairing existing plumbing. It is a highly technical job, and those who want to become plumbers should have a strong background in mathematics, science, and engineering. They should also be able to read blueprints and understand building codes. Additionally, plumbers should be able to communicate well with customers and clients.

A high school diploma is the minimum educational requirement for becoming a plumber. However, some people choose to attend a community college or trade school that offers programs specifically in plumbing. These programs provide classroom instruction on topics like local plumbing codes and regulations, blueprint reading, safety practices, and the theory behind plumbing systems. They also offer hands-on training on how to install and repair various types of plumbing fixtures and systems.

Once a person has completed their education, they can begin looking for an apprenticeship program. These programs can last up to five years and combine on-the-job training with classroom instruction. They can be found through a variety of sources, including local plumbing companies, unions, and contractor associations. Those who want to become plumbers should make sure to find an apprenticeship program that is certified by their state’s licensing authority.

In addition to completing formal education and on-the-job training, plumbers need to be familiar with a variety of tools and plumbing systems. For example, they should be able to use hand tools such as wrenches and screwdrivers, as well as more advanced power tools like pipe cutters and drain snakes. They should also be knowledgeable about different types of plumbing materials, and they should know how to identify potential problems and solutions.

Another important skill that plumbers need to have is critical thinking. This is because they often need to weigh different possible options when determining how to fix a plumbing problem. They must also be able to listen to customers’ complaints and determine the best solution for their needs. Plumbers should also have good communication skills, and they should be able to explain to customers what work is required and how much it will cost.

Experience Requirements

A plumber must have a wide variety of skills to install, repair, and troubleshoot plumbing systems in homes and businesses. These systems include water supply, heating, waste removal, and drainage. Plumbers are responsible for the safe operation of these systems and must follow building regulations and safety protocols. They also must be able to quickly solve problems and provide customer service when necessary.

To become a plumber, you must complete an apprenticeship program and meet educational requirements. While in an apprenticeship, you must take the opportunity to ask questions, practice your skills, and learn from your mentors. As you gain experience, you will be entrusted with more complex tasks and may eventually be ready to apply for your master plumber license.

As you gain work experience, make sure to keep detailed records of your jobs and hours worked. This will be useful when you apply for your master plumber license, as you will be required to have a certain amount of work experience to qualify.

Be punctual when working as a plumber, as this shows your commitment to the job and respect for others. It is also a great way to impress your future employer. Punctuality is especially important when working as a service plumber, since they will be interacting directly with clients and must respond to any concerns or questions immediately.

Plumbers must be able to understand and work with blueprints and technical drawings. This requires a good understanding of math and science, as well as knowledge of computer-aided drafting programs. In addition, a plumber must be able to quickly identify and repair issues that can range from minor leaks to complex system failures.

Because plumbers are tasked with installing and maintaining many types of systems in different environments, they must be flexible and willing to adapt to the needs of each project. They must also be able to handle unexpected challenges, such as working in cramped or difficult spaces or dealing with inclement weather. A successful plumber must be able to communicate effectively with clients and fellow workers, as well as read and write well enough to understand written instructions.

Licensing Requirements

Plumbers must be licensed to work in their field, and these license requirements vary by state and city. Plumbers who are licensed can design, plan, install, and repair plumbing systems in homes and commercial buildings. Licensed plumbers are also qualified to inspect plumbing work and ensure that it meets local codes and regulations. To become a licensed plumber, individuals must complete a vocational training program or an apprenticeship. These programs typically last four to five years and combine classroom instruction with paid on-the-job training. During this time, students learn about local codes and regulations, blueprint reading, and safety practices. A high school diploma is usually the minimum educational requirement, but some people choose to continue their education by enrolling in a technical or trade school. These programs can offer more in-depth instruction and prepare graduates for careers as apprentices or journeymen.

In addition to meeting educational and experience requirements, plumbers must pass a written and practical exam to obtain their licenses. The exams cover topics such as local plumbing codes and regulations, basic construction skills, and water supply and drainage systems. The exams also test the plumber’s ability to troubleshoot problems and make repairs. In order to maintain a license, plumbers must participate in a continuing education program every three years.

Many people who want to become plumbers pursue apprenticeships, which are sponsored by trade organizations and unions. These programs are available in most states, and they generally last between four and five years. During this time, plumbers earn a salary and work alongside experienced professionals to learn the ropes. In some cases, people who are interested in becoming a plumber can join a union, which can provide them with benefits such as pension plans, vacation days, and sick pay.

Plumbers often interact with customers, so it is important for them to have excellent customer service skills. This includes being able to listen to their concerns and answer questions clearly. They should also be able to work well under pressure and deal with stressful situations. In some cases, plumbers may need to repair broken fixtures or pipes under a tight deadline, so they must be flexible and willing to adapt to changing circumstances.

Insurance

What Type of Life Insurance Is Best For You?

Life Insurance Arlington helps ensure that your loved ones don’t suffer financial hardship when you die. It can help pay funeral costs and final expenses; provide income for your dependents; and pay off debts like mortgages or credit card balances.

Insurance

Our ratings highlight companies with solid financial strength and cost competitiveness, plus a range of policy options. We also consider customer satisfaction.

Life insurance provides a financial payout (often equal to the policy’s coverage amount) to your beneficiaries upon your death. This money can help them pay off debts or mortgages, cover funeral expenses, or even fund children’s college education. It can also provide them with a steady income that allows them to live comfortably without the worry of paying for basic living expenses.

In addition, some policies come with built-in features that can increase your cash value over time. For example, some whole life insurance policies offer a guaranteed minimum interest rate on the accumulated cash value. Other policies allow you to alter your premium payments or death benefits, within certain limits. Still others have investment subaccounts that you can choose and manage.

The main reason to get life insurance is to provide a safety net for your loved ones. However, there are other reasons you may want to consider it as well.

You may want to purchase life insurance to replace your lost earning potential, cover business debts or buyout partners in the event of a partner’s death, pay for retirement planning, or fund a trust or estate. You may also have other expenses that you want to ensure are covered, such as child care costs or medical bills.

If you’re thinking about purchasing life insurance, you should first analyze your financial situation and determine how much coverage you need. A good rule of thumb is to take your annual expenses and multiply them by 10. This number will give you a rough idea of how much coverage you need.

Once you have an idea of how much coverage you need, you can compare different options to find the best life insurance for you. Some factors to keep in mind include the length of the policy term, the death benefit, and the cost. Another consideration is the health of the applicant, as this will have a direct impact on your rates. Also, consider any lifestyle habits that could lead to increased risk, such as a dangerous job or hobby.

Term Life

Term life insurance is usually the most affordable option for most people. It pays a death benefit for a specific period of time (a “term”), typically 10, 20, or 30 years. Unlike whole life insurance, it does not build any cash value that you can borrow against or invest, and it ends at the end of its term instead of providing lifetime coverage.

A term policy can be a great way to pay off debts or provide income to your family after you die, especially if you have young children. It can also help cover funeral costs, estate taxes, and other expenses. Some people choose to end their term life policies when they reach the end of their term, but it’s important to be sure you really don’t need the coverage anymore before doing so. If you do decide to end your term life policy, make sure you get quotes for a new one so you can compare the options.

Some types of term policies can be renewed, but only up to a certain age and at a higher rate. Some also include a guaranteed renewal feature, so you won’t have to take a medical exam to renew the policy for an additional term, but this will increase your premiums. Guaranteed issue life insurance is a type of term policy that is easier to obtain than traditional policies without having to take a medical exam, but you may not receive the full death benefit if you are diagnosed with certain health conditions.

There are several different types of term life insurance, but the most common is level term. This is the simplest and most affordable version, and it offers a level death benefit for the duration of the term. Other options include decreasing term, which has a reduced death benefit over the course of the policy, and annual renewable term, which allows you to renew on a year-by-year basis and may increase your premiums each year.

Many term policies are convertible to permanent life insurance, which will offer a permanent death benefit and build cash value, but this will add to the cost of your premiums. You should talk to your agent to learn more about the benefits of each type of life insurance.

Whole Life

Unlike term policies, whole life insurance continues to pay out your death benefit as long as you continue to make your premium payments. It also offers a cash value component that acts like a savings account. Each premium payment is added to your policy’s cash value, which accumulates interest on a tax-deferred basis. You can access this money at any time for emergencies, supplemental retirement income or to cover final expenses. Withdrawals and loans are subject to a fee, but you can also leave the amount in your policy to earn additional interest. This is called a “living benefit” and it is one of the key benefits of whole life insurance.

In addition to a guaranteed death benefit, whole life insurance provides living benefits that can help meet many of your family’s needs. These include coverage for loss of income, mortgage costs, educational expenses and leaving a legacy. Many whole life policies also come with several riders and additional benefits, such as premium waiver and chronic illness coverage.

With whole life insurance, you can choose from a non-participating plan or a participating policy. The difference is that with a non-participating policy, the excess premiums paid go toward profit for the insurance company. With a participating policy, the extra money is redistributed to you as a dividend. You can use these dividends to help pay your premiums, withdraw them or take out a loan against the policy. Dividends are not guaranteed, but insurers like MassMutual—a CNBC Select pick and top-rated insurer—have a history of consistently paying them.

When choosing a whole life insurance policy, you want to be sure you’re getting the coverage you need at a price you can afford. It’s important to discuss your situation with a financial professional who can help you understand the options available and find solutions that work for you. A financial professional can review your entire picture, including your other investments and assets, to help you develop a strategy that fits your goals. They can also connect you with a whole life insurance agent who can help you determine if this type of protection is right for you.

Variable Life

Unlike whole life insurance and universal life, variable life insurance (VUL) contains an investment component. This means that the cash value can be invested in a range of asset options, like equity and money market funds. The performance of these investments will have an impact on the death benefit and cash value.

This makes VUL ideal for clients who are comfortable with investing their life insurance policy. They should also be willing to review their policy with a wealth management advisor regularly and adjust their investment choices and death benefit as their financial circumstances change.

In addition to the potential for higher returns, VUL can offer greater flexibility than other permanent policies. Clients can choose to overpay or max fund their policy in the early years and then reduce their premium payments as they approach retirement, allowing them to preserve their death benefits while meeting their long-term financial goals.

As with any investment, VUL has fees and expenses. These include internal policy costs, which can be a significant portion of the premium. In addition, the investments underlying the cash value have their own fees and expenses. Depending on how the investments perform, a VUL can have very low or very high internal costs.

Because VUL is a complex financial product, it is important to carefully review all of the associated charges with your clients. They should be aware of the fees and expenses that may apply to their individual policy and understand how these charges can affect the overall value of their policy.

A comprehensive understanding of the benefits of life insurance and the different types is essential for a client to make informed decisions about their coverage. With the help of a Thrivent financial advisor, they can better understand which type of life insurance best fits their unique needs and risk tolerance. Our streamlined client intake and digital forms make it easy for clients to complete the necessary paperwork from the comfort of their home. This helps to minimize paperwork-related mishaps, expedites the underwriting process and ensures that clients promptly receive their coverage.

Handyman

Painting New Drywall Requires Specific Preparation

Painting New Drywall requires a lot of patience and attention to detail. Using a good quality brush with tapered bristles helps to prevent broken bristles when putting paint around corners and fixtures. Using a roller with a shorter nap to avoid roller marks is important as well.

Drywall

Start with a quality primer specifically formulated for new drywall. Drywall can be very porous and will soak up lots of paint unless properly primed.

Painting standard walls is a relatively easy task that doesn’t require a lot of prior experience. However, painting new drywall is not as straightforward and requires specific preparation to achieve the best results. The process involves a few critical steps that must be taken care of correctly in order to ensure the quality of the final paint job.

To start with, the surface of the drywall must be cleaned thoroughly to remove all dust and debris. This step is essential to avoid poor adhesion, which can result in peeling or flaking over time. It is also important to make sure that any bare spots are properly filled and sanded before applying primer.

After the wall is cleaned and sanded, it is important to apply a high-quality drywall primer to the surface. This will help to seal the drywall and make it less porous, which will in turn make it easier for you to apply your top coat of paint. Choosing a specialized drywall primer will also save you money in the long run because it is typically much cheaper than the price of regular paint.

Once the primer has dried, it is important to sand the surface again in order to smooth out any gouges or rough edges. This will make the wall much more aesthetically pleasing and will make it easier to apply your desired color later on.

It is also important to note that you will need to apply multiple coats of paint to the drywall in order to get the desired coverage and appearance. This can be frustrating, but it is essential to give the drywall ample time to dry between each application. Otherwise, you will end up with a flaky and uneven finish that will not be appealing.

If you are unsure of how to prepare and paint your new drywall, consider hiring a professional team to do the work for you. They will be able to provide you with a high-quality paint job that will last for many years to come. In addition, they can take care of all the messy clean up, saving you valuable time and ensuring that your finished product is flawless.

Primer

As with any paint job, you’re going to need a good primer. This undercoat helps paint adhere to the wall, resulting in longer-lasting results. And that’s especially true when painting new drywall. The porous nature of new drywall means it’s likely to absorb quite a bit of the paint you apply. Without a primer, this absorption will create unsightly streaks in your paint job. Fortunately, there are plenty of quality primers available to help you get your walls ready for their color debut.

Choosing the right type of primer will depend on your needs and budget. For example, if you’re a DIYer on a budget you may want to go with a water-based primer like this one from Kilz. This low-VOC interior primer will seal and prepare drywall, while protecting against mildew and mold growth. It also covers stains and graffiti, and resists wood tannins, making it an ideal choice for your next painting project.

Another option is a tinted primer that’s already colored to match your drywall. This is a great choice if you’re keeping the same hue on your walls or if you’re using a dark primer on light drywall. Just be careful with this option since a tinted primer might alter the hue of your finished wall.

If you’re not sure what kind of primer is best for your needs, consider asking a professional. They can give you advice on the type of primer you need and help ensure that your paint job turns out perfect.

Regardless of what primer you choose, make sure that you follow the manufacturer’s instructions for application. This will help your paint job last as long as possible and look as amazing as possible. And don’t skip out on the sanding steps, either. A sanded surface is much better than an un-sanded one, so always sand after applying your primer and before you start applying your paint. With the proper preparation and priming, you’ll be able to transform your walls from bland to beautiful in no time. Good luck! And don’t forget to wear a dust mask and gloves when working with drywall.

Paint

Painting standard walls is relatively easy, but painting drywall requires special steps and procedures to ensure that the paint adheres properly and produces a professional-looking result. When doing a drywall paint job, it is especially important to properly prepare the surface before applying the first coat of paint. This includes repairing any surface defects, applying a primer sealer, and using proper techniques to achieve a smooth, even finish.

While a single coat of paint may work fine on a wall that has been previously painted, new drywall is porous and needs a separate primer to seal it properly and prevent uneven absorption of the paint. Choosing the right type of primer is also crucial. Water-based drywall primers are quick drying and low in VOC, while oil-based primers provide durability and are ideal for high humidity areas.

When selecting a primer for drywall, look for one that will be compatible with the finish and color you are planning to use on the wall. For example, a flat primer will work well with a latex paint but it won’t bond as well with an oil-based paint. Similarly, if you are making a big change in paint sheen, it is better to play it safe and apply a separate primer rather than risk having the darker base bleed through your lighter topcoat.

Regardless of the type of primer used, sanding the drywall before proceeding to the next step is a must. This step helps to smooth any rough spots caused by mud or tape seams and provides a much more uniform surface for the final coat of paint.

In addition to sanding, it is also a good idea to vacuum the entire area and wipe it down with a damp cloth. This will remove any remaining dust from the sanded surfaces, improve adhesion of the primer, and help to prevent the formation of a hardened film on the surface that is difficult to peel off.

There are several types of drywall paint available, including matte, eggshell, and satin finishes. Each of these options provides a different aesthetic but they all offer the same durable, washable finish. Additionally, there are specialty paints that are designed for specific applications, such as anti-microbial paints that resist mold and mildew and are suitable for bathrooms and other humid areas, or eco-friendly options that are free of VOCs and provide a healthy indoor environment.

Finish

When it comes to giving a room a new lease on life, nothing works better than a fresh coat of paint. Whether you’re re-doing the basement for a new living space or simply updating the look of your child’s bedroom, painting is essential. The right paint clings to the surface, stands up over time, and enhances your walls. But before you snag a can of your favorite color, there are a few important pre-painting considerations to take into account.

Drywall—even drywall that’s just been put up—can have small imperfections, such as dents or nail holes, which need to be filled and sanded before you can begin painting. This is a crucial step that can make or break your finished project. Once you’ve repaired these small issues and the wall is clean and sanded, it’s time to prime.

A good quality primer will help your paint cling to the surface and hide any blemishes or flaws on the wall. It will also prepare the drywall for the finish coat, which will ensure that the paint adheres to it properly. Depending on the color of your finish coat, you may need more than one primer layer.

Once you’ve chosen the paint you want to use, it’s important to choose a quality brush or roller for applying it. A brush offers more control, while a roller is efficient and covers large areas quickly. Be sure to select a high-quality roller cover that won’t spatter or leave lint behind. Avoid polyester roller covers, which can lead to drips and streaks; lambswool or mohair are better choices.

After you’ve applied a coat of primer, let it dry thoroughly before moving on to the final finish paint. This can take 24-48 hours, depending on the humidity level where you live. During this time, be sure to keep the work area well-lit to see any defects that aren’t readily apparent when the wall is dimly lit. If you notice any problems, shine a light on them from different angles and circle the affected spots.

Once the first coat of paint is completely dry, lightly sand it with 150-grit paper and apply another coat. This will help the second coat of paint to adhere more fully to the drywall and hide any visible seams and edges of the first coat.

Plumbing

The Essential Duties of a Plumber

Topeka Plumber is responsible for installing and repairing pipes that carry water, gas, sewage, and waste to and from homes and businesses. They also inspect plumbing systems to ensure they are functioning properly. They use specialized tools and skills to troubleshoot problems. They collaborate with other professionals to ensure that plumbing systems integrate seamlessly into building projects and meet appropriate standards and regulations.

plumber

The plumber’s job is to install, maintain, and repair plumbing systems in residential, commercial, and industrial settings. These systems facilitate the distribution of water, gas, and waste, and ensure the health and safety of occupants. Plumbers also collaborate with other professionals, such as construction teams and architects, to ensure plumbing is seamlessly integrated into building projects. In addition, they may provide emergency services, such as responding to calls from customers with burst pipes or clogged drains.

Many plumbers work in the field, traveling to different locations to perform their duties. They must be prepared to spend a large amount of time outdoors, especially in poor weather conditions. In addition, they often have to work in tight spaces and crawl on the floor. These conditions can make the work physically demanding and exhausting. Some plumbers choose to become self-employed and operate their own businesses, which can give them more control over their schedules and choice of projects.

Those who pursue a career as a plumber typically gain the necessary skills through an apprenticeship program, which offers classroom instruction and paid on-the-job training. The length of the apprenticeship varies, but it generally lasts for four to five years. Some apprenticeship programs are sponsored by trade unions, while others are offered through vocational schools. In addition, some states require that plumbers obtain a license before they can work on their own.

In some cases, plumbers can become certified as a master plumber after passing a series of tests and gaining work experience. This can help them advance in their careers and increase their earning potential. Plumbers who are interested in becoming a master plumber can find courses offered through vocational schools and community colleges. In some cases, these courses can even lead to a degree in plumbing engineering.

In addition to their professional skills, plumbers need to have good customer service skills to interact with clients and provide advice. They must be able to explain plumbing issues and describe the necessary repairs in a clear way. They must also be able to provide estimates for their services. Additionally, plumbers must be able to read blueprints and understand local building codes and regulations.

Float switch

Float switches are used to control the level of liquids in tanks or containers. They work by opening or closing dry contacts, which then send an electrical signal to a water level alarm to indicate that the switch has either triggered a high or low level. These signals are then used to trigger an appropriate action, such as activating a pump to drain a tank or turning off the water supply.

The float switch is available in different designs to suit the specific needs of each application. You can choose from a variety of threaded mounting options, reed switch choices including single pole double throw and single pole single throw, and customizable lead wire lengths. Most float switches are constructed of durable materials like brass and buna, while others are made of plastic for highly corrosive applications. Some models also feature a choice of mounting points and stems to allow you to position the switch directly above your desired fluid level.

Some float switches are two-stage, which means they have a first stage that activates when the float reaches its trigger point. This first stage may be to switch off the pump, to turn on an alarm, or both. The second stage can be a second alarm, an on/off switch, or a continuous-duty relay/valve. You can even select a switch with a normally closed or a normally open switching function, depending on the type of application you have in mind.

A float switch is an important tool for home greywater systems to help prevent the water level from rising in the sump pit. Typically, they are connected to a pump to drain the system and prevent an overflow of wastewater. Float switches are also widely used in beer and wine production to monitor storage levels. High-level alarms signaled by float switches help prevent hops waste from spilling during brewing. They are also used to control water levels in maple syrup collection containers during the tapping process.

Before choosing a float switch, consider the size and depth of your tank. The height and location of the float should be taken into account, as well as the operating voltage and current rating of the switch. The float switch’s internal switch is also important to determine. Depending on your application, the switch may be a Normally Open (NO), a Normally Closed (NC), or a SPDT.

Maintenance

Plumbing is a highly skilled and challenging profession that requires knowledge of a wide range of techniques, tools, and building codes. Plumbers often work in a variety of environments, from residential homes to large industrial buildings. They install and repair pipes, fixtures, and appliances that are involved in the distribution of water. They also inspect plumbing systems for leaks and other problems. Many plumbers complete a vocational school or trade union apprenticeship program to learn the skills of the trade. Some also attend a college degree program to obtain an associate’s or bachelor’s degree in plumbing technology. Other plumbers acquire their skills through on-the-job training with a master plumber.

Plumbers must have good customer service skills and be able to explain complicated issues in easy-to-understand terms. They must also be punctual and reliable, as they often respond to emergency calls from customers. They need to be able to identify the source of the problem and make necessary repairs quickly.

Licensed residential plumbers are trained to perform new installations and repair existing fixtures in residential settings. This may include toilets, showers, faucets, garbage disposals, and water heaters. They can also handle larger-scale plumbing projects for homes, including re-piping and whole-house re-plumbing. Licensed commercial plumbers are trained to handle larger plumbing systems found in commercial and industrial settings. This includes specialized equipment like sewer cleaning machines and high-pressure water pumps.

Plumbers must be able to interpret blueprints and plans to ensure that their work complies with local, state, and federal regulations. They may also need to inspect plumbing systems using specialized equipment, such as video cameras and pressure gauges. In some cases, they may need to collaborate with other professionals, such as architects and construction teams, to ensure that plumbing systems are integrated seamlessly into building projects. In addition, plumbers must be able to navigate hazardous materials and work in confined spaces.

HVAC

Why Furnace Repair Is Worth the Investment

Cincinnati Furnace Repair is a costly endeavor, but often worth the investment to ensure you and your family stay comfortable. Choosing the right contractor can significantly minimize costs by ensuring repairs are done correctly and protecting warranty coverage.

Furnace Repair

Unusual noises like banging, whining or rattling are common indicators that something is wrong with your furnace. A skilled technician can pinpoint the issue and perform furnace repair quickly to restore heat to your home.

A furnace’s ignition system controls the combustion process that warms up your home. If your furnace’s ignition system isn’t functioning correctly, you might notice that your home doesn’t heat as it should. This is a sign that the gas ignition system needs repairs or replacement. While some minor issues can be resolved by homeowners, complex problems should always be repaired by a professional.

In some cases, your ignition system might need replacement because the igniter is cracked or broken. Located below your furnace’s access cover, the igniter is responsible for heating the fuel and starting the combustion process. Inspect the igniter to see if it has a yellow tint or shows any signs of wear. If you notice a yellow tint or any other problems with the igniter, turn off your furnace and call a professional.

If you have a newer furnace that uses an electronic ignition system, it may be difficult to diagnose this issue without the help of a technician. However, if your older furnace still has a standing pilot light, it is possible that the pilot light has gone out or that the ignitor switch has stopped working.

If your ignitor switch isn’t working, you won’t be able to get your furnace to produce heat even though your thermostat settings are correct. In addition, a malfunctioning ignitor switch can increase the amount of wear and tear on your furnace. An experienced HVAC technician can inspect your ignitor switch to see if it’s malfunctioning or needs replacing. They can also clean it if it is dirty.

Short Cycling

If your furnace turns on and off frequently without ever reaching the temperature set by your thermostat, your system is short cycling. This condition disrupts your comfort and increases energy bills while also placing extra stress on the system. Fortunately, there are many potential solutions to this problem.

One common cause of short cycles is a dirty air filter. When the filter becomes clogged, it restricts airflow to the heat exchanger and causes it to overheat. The furnace’s built-in safety devices then shut the system down to prevent damage. Changing the air filter or replacing it entirely can help fix this issue.

Another potential cause of short cycling is a faulty thermostat or battery. Old or weak batteries interfere with the thermostat’s ability to correctly read your home’s temperatures, which can affect cycle length. Changing the batteries or relocating the thermostat to a cooler area can often remedy this issue.

A clogged flue or vent pipe can also trigger the system to shut down. The flue is designed to release hazardous gasses, so if it becomes blocked by debris such as a bird’s nest or dead vermin, the system will overheat and shut down as a precautionary measure.

If the above troubleshooting steps fail to help, it’s time to call a professional. An HVAC technician will have the tools, skills and knowledge needed to diagnose the issue and repair it promptly. They can also assess your current system to determine if it’s the right size for your home’s heating requirements. Getting a new, properly-sized furnace can help you avoid costly repairs and short cycling in the future. Contact us to learn more about our furnace installation services today.

Insufficient Airflow

When your furnace kicks on, it should be blowing plenty of warm air throughout the house. If you’re noticing weak airflow, it may be time for a heating repair.

A few simple tasks can help improve weak airflow in your furnace. Start by inspecting vents for obstructions, checking for closed dampers, and evaluating ductwork insulation. These basic maintenance steps can make a big difference in the performance of your system.

Changing air filters regularly is another important way to enhance your system’s performance and efficiency. Make sure to use a filter that fits your system, and replace it whenever it’s clogged with dust and debris.

If your furnace is producing excessive amounts of smoke or a burning smell, it’s time for an inspection and cleaning by a professional HVAC technician. In these cases, the underlying problem can be complex and require specialized expertise.

One of the most common reasons for poor airflow in a furnace is blocked flue pipes. These pipes transport dangerous combustion fumes out of the home, but if something blocks them from exiting, it can cause carbon monoxide poisoning, a fire, and serious health consequences.

Maintaining proper ventilation during a furnace repair is essential to ensure the safety and comfort of the homeowner and anyone else in the vicinity. Ventilation standards outline criteria for vent sizing, clearance distances from combustible materials, and other factors that promote safe working conditions in confined spaces like a furnace room.

Carbon Monoxide Leaks

Carbon monoxide, known as the silent killer, can be produced by furnaces or other gas appliances that aren’t operating properly. It’s a colorless, odorless and tasteless gas that can cause a wide range of symptoms in humans. It builds up in the body and displaces oxygen, causing poisoning that can be fatal.

The best way to prevent carbon monoxide leaks is to install carbon monoxide detectors and keep them regularly tested. It’s also essential to have your furnace and any other gas-powered appliances checked by a professional on an annual basis. During a regular tune-up, the technician will replace the air filter and lubricate the motor to help avoid carbon monoxide leaks.

Other ways to prevent carbon monoxide leaks is by making sure that your flue pipes and chimney are in good condition. Over time, these components can corrode or become blocked with soot and other debris. During routine inspections, the technician can make sure that they’re clear and free from damage or obstructions.

Lastly, never use generators or portable fuel-burning appliances inside your home. They should always be used outdoors or in well-ventilated areas. If you or anyone in your household develops any of the signs and symptoms of carbon monoxide poisoning, seek medical attention immediately. Pregnant women should be especially careful, as carbon monoxide can attach to fetal hemoglobin at a level 10% to 15% higher than it does in the mother.

A carbon monoxide detector will sound if the CO levels get too high, helping you take action before the problem gets worse. By following these tips, you can greatly reduce your risk of carbon monoxide poisoning from your furnace this winter.

Electrical Issues

As with any electrical system, a furnace’s electrical connections can become faulty over time. This can affect the system’s ability to function, as well as pose safety risks to homeowners. This is a type of problem that should be handled by a professional, as the proper handling of wires requires knowledge and skill.

One of the most common issues related to furnace electrical components is a faulty capacitor. Capacitors store and release electrical energy to help start the motor that drives your furnace’s blower fan. When a capacitor wears out, it may stop working and lead to motor failure.

A bad fuse is another electrical issue that can negatively impact your furnace. Fuse problems typically stem from a lack of maintenance, which leads to the accumulation of dust and grime on fuse terminals that prevent them from connecting properly. Using a fuse with the wrong capacity is also a culprit. Trained technicians can quickly diagnose a faulty fuse and recommend a replacement.

Other electrical issues include problems with the thermostat’s wiring and the control board. A faulty thermostat can lead to unreliable temperature controls, while wires with loose ends can cause short circuits that shut down the entire unit.

Before you tackle any DIY furnace repair, be sure to turn off the power supply to the system. This will eliminate the risk of accidental contact with live wires and minimize your exposure to electric shock. It’s also a good idea to wear non-conductive work gloves and use insulated tools whenever possible. A voltage tester is also a helpful tool to have on hand, as it allows you to test whether an electrical component has an active current without touching it.

Concrete Contractors

Elevating Your Outdoor Spaces With Stamped Concrete

Imagine stepping onto your back patio and being greeted with the rich texture of Stamped Concrete Dallas designed to look like rustic flagstone. Or, picture a winding walkway that mirrors the elegance of natural cobblestone.

This style of outdoor flooring has gained popularity in recent years for its versatility, durabilit, and added value to your home.

With a variety of colors, patterns, and textures to choose from, stamped concrete offers endless opportunities for customization. It can be designed to resemble other materials, such as natural stone and brick, or it can be made to look more modern with geometric designs. Its versatility allows homeowners to find a style that suits their aesthetic preferences and complements the architecture of their homes.

Stamped concrete comes in a wide range of patterns and color options, making it the perfect choice for outdoor patios, pool decks, walkways, driveways, and more. It can be molded to look like running bond brick, worn rock, stone, hexagonal tile, and more. For added appeal, it can also be stained and sealed. This process enhances the appearance of the concrete and makes it more resistant to stains, abrasions, and UV rays.

When choosing a color for your stamped concrete, it is important to consider how it will look with other elements in your landscape. For example, if you have a lot of greenery in your yard, consider using earthy tones that will compliment and blend with the colors of your trees and shrubs. You can also use color hardeners during the stamping process to create a more natural appearance, by adding streaks of different hues that mimic the shading and color variation found in stone.

Another option is to incorporate stencils and hand-colored designs into your stamped concrete. Stencils are popular for creating a focal point on a patio, such as a family crest or sports team logo. Stencils can be painted or spray-painted on the concrete, and they will not fade with exposure to sunlight.

Once the concrete has been stamped, it is important to seal the surface to protect it from stains and damage. There are two types of sealers available: topical and penetrating. Topical sealers sit on top of the concrete, while penetrating sealers enter the pores and help to prevent fading. By regularly cleaning and resealing your concrete, you can ensure that it will last for years to come. For more information about customizing and maintaining your new stamped concrete, contact the masonry experts today!

Durability

Many homeowners want to improve the look of their outdoor spaces. But the typical options like flagstones, bricks and tiles are expensive and require a lot of maintenance. One solution that combines affordability, durability and aesthetics is stamped concrete. This innovative paving material can replicate the look of stone, wood and other materials at a fraction of the cost. And unlike traditional paving materials, it can be poured and stamped over existing surfaces without costly extraction.

Stamped concrete is also highly versatile in terms of its design options. Homeowners can choose from a variety of textures, colors and patterns to create a unique patio that complements their home’s architectural style. From the rustic charm of cobblestone to the sleek sophistication of slate, stamped concrete offers a wide range of popular designs.

With a little help from your contractor, you can also customize your stamped concrete project to suit your specific needs. To start, you’ll need to select the desired pattern and color of your concrete. Next, the contractor will prepare the area and pour the concrete. They’ll then use a special stamp to imprint the concrete with the chosen design. A release agent is then applied to prevent the stamp from sticking to the concrete and creating an uneven surface.

The stamped concrete will then be washed and sealed to protect it from water damage and other environmental factors. You can keep your stamped concrete looking new by cleaning it with mild detergents or soap and water on a regular basis. It’s important to avoid using abrasive cleaners, which can cause the concrete to crack or chip. You may also need to have your concrete re-sealed on a yearly basis, depending on how heavily it’s used.

While it’s possible to install a stamped concrete patio yourself, we recommend hiring a professional to ensure the job is done correctly and safely. There are a lot of things that can go wrong during the installation process, from misjudging the concrete mix to gauging the right time to begin stamping the concrete. Hiring a professional will save you money and eliminate the risk of a disastrous DIY patio project.

Low-Maintenance

The best part of stamped concrete is that it requires very little maintenance to keep it looking its best. A few simple steps like sweeping, hosing off, and resealing every couple of years will help protect it from weather and staining. This is a great benefit for those who don’t want to deal with the upkeep of traditional materials, such as pavers or natural stone, in their outdoor spaces.

The stamping process can be done with a variety of different patterns and colors to create a unique look. Some of the most popular options include brick, stone, slate, wood, and textured (cobblestone or tile). A concrete contractor can help you choose a pattern that fits your style and complements other elements in your space.

Once the concrete is poured and colored, the stamping can be done while it’s still wet. It’s important to use a release agent before stamping, so that the concrete doesn’t stick to the stamps and tear. Once the concrete is pressed into the stamps, it’s then topped with a water-repellent sealant to prevent damage.

If you do notice a stain, a bit of elbow grease and a diluted acidic cleaner should work to break it down. Just be sure to rinse the surface thoroughly afterward. If the stain is caused by oil or other chemicals, it’s a good idea to use a concrete stain inhibitor that has hydrophobic properties. This will keep the chemicals from etching or damaging the concrete and can even extend the life of the sealant.

As with any type of paving material, stamped concrete can become damaged over time, especially if it’s exposed to a lot of traffic or the freezing and thawing cycles that happen during the winter. In these cases, it may be necessary to repair cracks or damaged areas as soon as possible.

Ultimately, stamped concrete is less expensive than the materials it mimics, making it a cost-effective option for homeowners and businesses alike. It can also be much easier to maintain than other paving materials, making it the ideal choice for busy areas.

Eco-Friendly

Unlike traditional pavers and slabs, stamped concrete is an eco-friendly paving option. This is because it utilizes a recycled material that would otherwise have been discarded as waste. Plus, it is less expensive than materials such as flagstone and brick, while providing a high-end look. Whether you are designing your patio, pool deck, driveway or walkway, it’s important to choose the right material for the job. While many homeowners opt for stone, pavers or bricks, these materials can be costly and require extensive maintenance. For those looking for a more budget-friendly and low-maintenance solution, stamped concrete is an excellent choice.

As the name suggests, stamped concrete is a type of decorative concrete that has been imprinted with a pattern or design. The process is similar to regular concrete, but the result is a unique and beautiful paved surface. There are a variety of patterns and colors available, so you can find the perfect match for your home. Choosing the right color and design will also help to create a seamless transition between your outdoor living spaces and your interior decor.

When it comes to eco-friendly paving, stamped concrete is one of the greenest options out there. It is made from recycled concrete and Portland cement, so it’s an environmentally friendly alternative to other paving materials. It is also less expensive than other paving materials, and it is easy to repair. Additionally, stamped concrete doesn’t require the use of chemical products or de-icing salts, which are harmful to the environment.

Stamped concrete is also highly customizable, so you can choose a design that will complement your landscape and home. You can even select a colored concrete mixture that matches the color of your home or other outdoor features like your driveway or pool. This allows you to create a custom, one-of-a-kind patio that will make your home stand out from the rest.

When it comes to cleaning and maintaining your stamped concrete, regular sweeping and occasional pressure washing with a garden hose or power washer will keep it looking new. It’s also a good idea to apply a color sealer every two to three years. This will protect the surface from weathering, dirt and other environmental factors that can cause damage over time.

AC Repair

AC Repair: Troubleshooting and Diagnosing Common AC Problems

Throughout the summer, your air conditioner works hard to keep your home cool. Unfortunately, it may occasionally experience minor issues that require the help of a professional.

Fortunately, scheduling AC maintenance twice a year can minimize the number of repairs your system requires. Here are five common problems that AC Repair technicians see and address. Contact AC Repair Encino now!

The blower fan inside your indoor unit and the condenser fan in your outdoor unit both use motors to operate. If these motors start to go bad, your AC system may struggle to cool your home. Fortunately, the problem is usually easy to diagnose and fix. If the fan isn’t working at all, it’s pretty clear that something has gone wrong with the motor. On the other hand, if you can’t feel air coming out of the vents, there could be a few different issues that need to be addressed.

One common reason for a failing fan or blower is a clogged air filter. If you’re not changing your air filters regularly, a dirty filter can cause the blower to slow down or stop moving altogether.

A more serious issue is a burned-out motor. This can happen if you don’t keep up with regular annual or biannual maintenance services. It can also be caused by overworking the motor, which causes it to overheat and burn out.

Lastly, if the fan isn’t turning, the problem is most likely in the compressor or contactor. The contactor regulates power flow to the motor, and if it’s not functioning properly, the motor will not turn on. To check the contactor, you’ll want to start by checking that the switch is on. If it is, the next step is to go outside and listen to see if the fan in the outdoor unit is running. If the fan in the outdoor unit is not spinning, it’s most likely a contactor issue and you’ll need to call for an AC repair service.

If you can hear the fan in the outdoor unit buzzing but it’s not spinning, you should do a visual inspection to make sure the fan isn’t stuck. It’s possible that it’s obstructed by a tree branch or something similar, which is an easy problem to fix by simply clearing the obstruction.

If the fan in the outdoor unit is obstructed by dirt or other debris, you should not try to open the unit and insert anything into it yourself. This is a job that should be left to an experienced AC repair technician, who can easily clean or replace the fan.

Failing Contactor

There are many electrical parts in your air conditioner, and they all must work together to make it throw cool air. Unfortunately, even the smallest of the components can cause a big problem when they fail. Two of the most common AC problems are a failing capacitor and contactor. These two electrical tag team members work hard to power your AC, and they can be relatively inexpensive to replace or repair if you catch them early.

A failing contactor can often be identified by unusual noises coming from your AC unit. Chattering and humming noises can be the result of a poorly functioning contactor, and they are caused by the rapid movement of metal coils, plungers, and contacts. This type of issue can lead to energy waste and potential damage to other components in the unit if left untreated.

Other signs of a poor-functioning contactor are an unresponsive air conditioning system and signs of overheating components. A contactor that fails to open or close properly will prevent the flow of electricity to the compressor and fan motor, which can cause them to overheat. In addition, a faulty contactor can also fail to shut off the AC when instructed by the thermostat.

You can test the condition of your contactor with a multimeter. Using the meter on the OL (open loop) setting, connect one of the leads to the contactor coil and another lead to the ground terminals. A proper reading should be in the range of 10 to 100 ohms. A higher reading indicates that the coil is bad, and a lower one means the contactor is not functioning correctly.

Visual inspection of the contactor control switch can also reveal the need for a replacement. Burnt, melted, or pitted contact surfaces are typically an indication that the switch is experiencing severe electrical arcing. In addition, a charred or melted casing can indicate that the contactor has been exposed to high levels of heat for an extended period of time. A qualified HVAC technician can determine the source of the failure and recommend an appropriate solution.

Failing Capacitor

A capacitor is the electronic device in your air conditioning system that gives a boost of power at the beginning of each cycle to bring the fan motor up to speed. Like all other electrical and mechanical devices, capacitors are prone to failure over time. When they start to go bad, you may notice a few common symptoms.

One of the most obvious bad AC capacitor symptoms is a lack of airflow from your vents. Your AC isn’t running properly, and this problem is going to make you uncomfortable in your home. Another symptom is a humming sound. This is a sign that your capacitor is struggling to start the compressor and fan. A failing capacitor can damage these expensive components, so it’s important to get it replaced right away.

The first step in fixing a failing capacitor is to turn off the electricity at your unit’s service panel. This will prevent any unwanted accidents from occurring while you’re working on it. Then, use a screwdriver to open the service panel and find the capacitor. It’s usually a metal cylinder with two or three terminals on the top and wires attached to them. Once you locate it, do a visual inspection to check for any signs of trouble.

Look for any bulging, cracks or oil leaking from the capacitor. If you see any of these issues, it’s a good idea to call in an HVAC specialist as soon as possible to replace the capacitor.

It’s a good idea to buy a spare capacitor for your AC so that you can have it on hand in case of emergency. Then, you can have a professional install it for you so that your air conditioner is back up and running as quickly as possible.

A multimeter can be used to test a capacitor. The process is fairly straightforward: you just need to connect the ends of the capacitor to a voltmeter and check for an output of electricity. The capacitor needs to be discharged before it can be removed and replaced, so you’ll want to be sure to wear safety gear and take precautions to protect yourself from any accidental electric shocks.

Failing Condenser Fin

The AC condenser is where warm refrigerant passes its heat to the air outside of your building. During this process, the cooling fins on the top and bottom of the unit can bend or become damaged which restricts air flow and reduces efficiency.

Air conditioner repair technicians use a special tool called a coil fin comb to straighten bent or broken fins. Attempting to do this yourself may cause further damage so we recommend that you consult a professional unless you are confident in your abilities.

A clogged condensate drain tube is another common AC repair issue. The drain tube runs from the outdoor unit to a nearby water drain or floor drain in your home. This tube can get blocked by dirt, algae, or mold and allow water to leak inside your air conditioning system. If you notice a puddle on the ground near your condenser unit or hear a hissing noise, contact a professional immediately to check out your air conditioning system for a possible clogged condensate drain.

Electrical failures are a more serious problem that usually requires professional AC repair. The relay switches, capacitors and wiring that power the motors on the fan and compressor can all fail, causing your air conditioner to stop working altogether. Professional technicians will need to diagnose the specific problem with these components and replace them as needed.

An AC condenser that is over ten years old will likely require a replacement. A faulty condenser can drastically affect your energy bill and it’s usually more cost effective to invest in an entirely new air conditioning system that will provide you with many years of reliable service.

Performing your own AC repairs can be time consuming and expensive. The best way to save money on AC repairs is to prevent them by keeping up with routine maintenance. To do this, start by clearing the area around your outdoor unit and trimming any bushes or tall grass that might come into contact with it. It’s also a good idea to build a fence or gate around your unit to keep pets, lawn mowers and other debris out of the cooling system. A well-placed fence will also help to deter vandalism and other types of damage that can be very costly.